Monday, January 28, 2013

Raising chickens with goats


I have seen from my next-door neighbor how raising chickens and cows together are a perfect match. The chickens learn to stay away from the cows so they don't get trampled, but they pick through the feed that the cows drop, eating what would otherwise get wasted. Chickens will even pick through the cow manure looking for fly larvae, supplementing their diet with extra protein. With enough chickens, your fly problem will be reduced significantly. However, they can't dig deep through the stuff, so chickens aren't going to solve a growing manure problem for you.

What about goats? You are going to have a few more challenges mixing chickens and goats, but you will have many of the same benefits that you do with cattle when they share the same yard. Here are a few issues that you will want to think about when considering combining your flock and herd:
  1. Goats are high-energy, curious, and adventurous eaters. While it may be OK for the chickens to pick through the alfalfa that you feed the goats, you don't want the goats to get into the chicken feed. Goats will abandon their own feed in favor of the higher grain content from chicken feed. If you feed the chickens where the goats can't get access, this should solve the problem. In addition, I doubt that the goats would bother the hen's eggs, but it is probably safest if the goats don't have access to these either.
  2. Both goats and chickens can spread coccidiosis to each other, a parasite that comes from picking through their manure. It can be devastating to both kids and chicks. This is the biggest reason why chicks are often fed medicated feed as a precaution while they are under the biggest danger (3 to 7 weeks). From the Goat Handbook, M. C. Smith; Cornell U., Ithaca, NY, "...although most goats carry coccidia and will have positive fecal exams, normally only the young kids become sick with coccidiosis. Deaths and stunted kids result. Raising kids separately from adults, keeping pens clean and dry, preventing fecal contamination of water or feed, and, in some herds, continuous preventative medication are necessary to prevent the disease. It is neither possible nor desirable to completely eradicate coccidia from the adult goats. A low level infection with the parasite serves to keep these goats immune to the disease."

Source : http://goatcommune.blogspot.com/2010/04/raising-chickens-with-goats.html

magical carpet cleaner


Several weeks ago I was heading out the door to a dinner party. In one arm I held a big salad bowl. In the other was a glass jar of salad dressing I had just made. As I tried to manuever open our heavy front door, the jar slipped out of my hand. In slow motion I yelled "Noooooo!" as the glass shattered on the wood floor and the contents splattered all over the wall and our cheap apartment carpet.


You guys, I was so upset. I was already late to this party and all I wanted to do was sit down in the middle of this puddle of oil and vinegar and cry. Instead I picked up the glass pieces, did a quick wipe up with paper towels and left the big clean up until later. Over the next few weeks I tried every carpet cleaner at my local grocery stores (yes, plural). Nothing was working. And my front entry way continued to look like this.
I didn't want visitors because it was so embarrassing. No, this condo is not our own but I like to live in cleanliness so I continued to try to clean it with no luck. Then my mom came to visit and suggested I try white vinegar. I didn't really give it much thought because it seemed either too easy or too smelly.

Well, this weekend I had enough. I searched for a remedy and found it! Of course, it contains white vinegar because my mother is always right. So I'm going to share with you my wisdom because I'm sure I'm not the first person to spill oil-based something on their carpet (right?).
1. Scrape up the liquid (I had already done this weeks ago).
2. Sprinkle baking soda or cornstarch on stain to let absorb for 10 minutes and then vacuum.
3. Mix one tablespoon clear dishwashing liquid and one tablespoon white vinegar with two cups of warm water.
4. Using a white cloth (I strongly believe in microfiber washcloths), sponge the stain with the detergent/vinegar solution and blot until all the liquid is absorbed.
5. Sponge off with cold water and blot dry.

source : http://elizabethbryant.blogspot.com/2011/02/magical-carpet-cleaner.html

Sunday, January 27, 2013

How to Make a Simple Solar Water Heater


Energy conservation is the greatest need of today’s world where man is consuming natural resources in great quantity without discovering

new ones. However, if you want to reduce your heating bills and save up the fossil fuels and nonrenewable energy sources, then use the sun

energy. The best possible way to take advantage of the solar energy and to reduce your energy cost is to make a simple solar water heater.

You can make it with a few disposable things easily available in your home. This unique invention is a great gift for those who have little

space or money. You can make this magical solar water heater within a few minutes and get a number of benefits in long term.

Read the simple steps given below and use the Solar Energy (Sun) to heat water and save energy for your upcoming generation:

Things you will need to make Solar Water Heater
 - Plastic Soda Bottle
- Black Paint or Black Paint Spray
- Sunlight
- Water
- Foil
- Mirror
 - Radiator
- Black Fabric
- Elastic Band

5 Steps For How to Make a Simple Solar Water Heater


1-Take a large empty plastic soda bottle. A bottle with 2 to 3 liter capacity would be enough to make a Solar Water Heater.


2-Now, take a black paint or black spray and coat the soda bottle completely. Wait for a few minutes until the paint or spray dries well. It

helps in preventing the heat from escaping. However, if you do not have paint then you can use a black fabric as well. Make sure to secure

the black fabric with a thread or an elastic band so that it collects heat properly.


3-Gently pour water into the bottle until filled completely.


4-Now, place the soda bottle in the sunlight where it can receive the rays of sun. Put it in a closed car because it is a great idea, working

effectively. Other than that, you can place it behind glass on a window. You can use a shinny equipment like a mirror or foil to grab extra

power and to attract the rays of the sunlight. Leave the bottle in sunlight for a few hours until the water warms properly. Wow! You have

enough of warm water without using even a single unit of electricity.


5-You might be thinking of the winter when sunny days rarely happen. Do not worry at all and place the same painted bottle near a radiator

to get warm water.


source : http://www.stepbystep.com/how-to-make-a-simple-solar-water-heater-9242/

Thursday, January 17, 2013

Homemade Hand Cream


Homemade Hand Cream:
16 oz. baby lotion
8 oz. Vaseline
8 oz. Vitamin E Cream
Mix with electric mixer til  it resembles icing.
Put in containers.
So easy to make, inexpensive and wonderful!

Friday, January 11, 2013

the easiest way to cook corn on the cob


 Never boil corn again! Want to know the easiest way to cook corn on the cob? Throw it in the oven at 350° for 25-30 minutes. That’s it. Leave the husk on, it will trap in the moisture, leaving you with juicy, tender corn. The husk and silk will peel away easily once it’s cooked. Cut off the large end and it slides right out with no silk. We do this all the time.....good on the grill too!

Thursday, January 10, 2013

Camping Knots for Wilderness Survival


Knowing how to tie good camping knots is an invaluable skill in wilderness survival situations. Its also a great asset when having fun in the outdoors. There are a wealth of different knots out there that you can learn to tie. With so many different knots, you might find it hard to choose which to learn first. Here are 3 of the most useful knots for camping and wilderness survival.
Square Knot
Also called a reef knot, this knot is useful for tying bandages, packages and joining shorter pieces of rope together. It is excellent for joining sections of survival cordage.
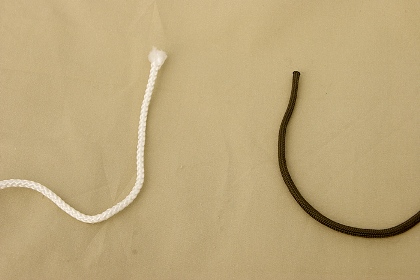
camping knots square knot 1
To begin, lay the ends of the ropes parallel and then pick up a rope in each hand.
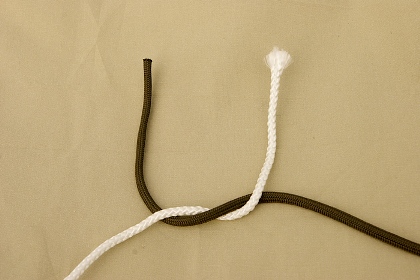
camping knots square knot 2
Now tie an overhand knot as you would for tying your shoe laces by putting the right end under and over the left rope end.
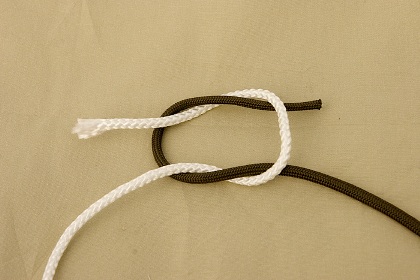
camping knots square knot 3
Then tie another overhand knot, this time putting the left end under and over the right rope.
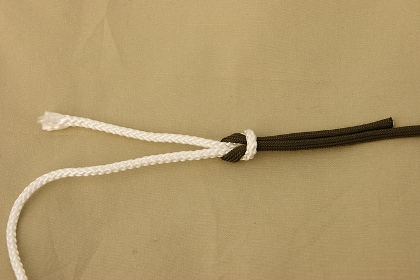
camping knots square knot 4

Completed Square Knot


Clove Hitch
Like all hitches, this camping knot ties a rope to an object. The word “clove” comes from the word “cleave” which means to hold fast. This knot is used to start and finish all types of lashings, including lashings for survival shelters.
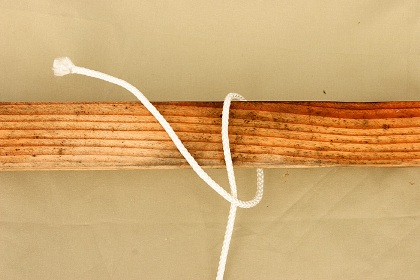
camping knots clove hitch 1
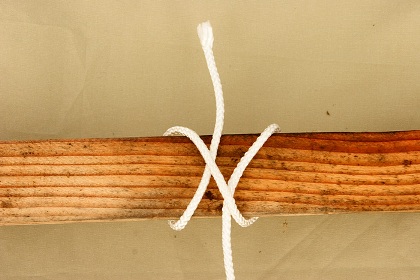
To begin, bring the rope end over and under the post. Next, take the rope around a second time, crossing it over the first wrap to form an X on the post.
camping knots clove hitch 2
Now, bring the rope end around a third time, and tuck it under the center of the X.
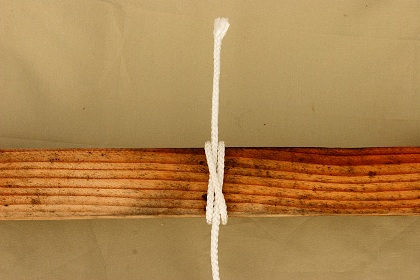
camping knots clove hitch 3
Tighten by pulling the end and the main line apart.


Bowline
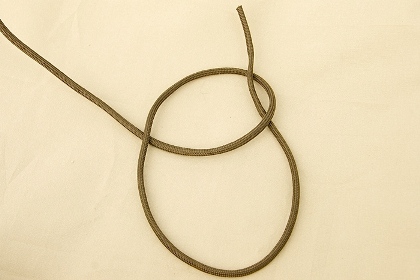
One of the most important camping knots to learn is the bowline knot. Because it does not slip, it is a great knot for all sorts of uses including securing tarps, lifesaving operations, and mountain climbing.
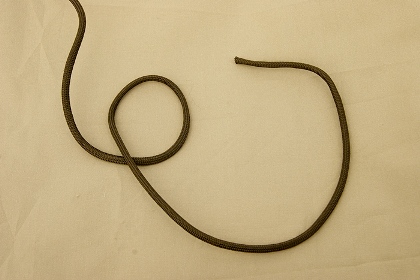
camping knots bowline 1
To start the bowline, first make a small loop on the rope.
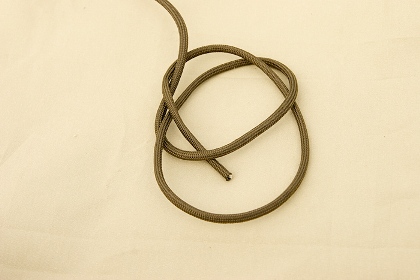
camping knots bowline 2
Take the rope end through the loop, around the main line of the rope and back down into the loop.
camping knots bowline 3
Try to remember “the rabbit comes out of the hole, goes around the tree and then back down into the hole.”
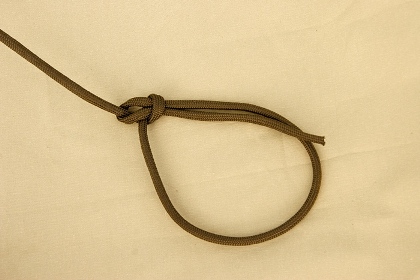
camping knots bowline 4
To tighten, pull the main line of the rope away from the loop.


Knots are often an essential skill for wilderness survival situations. They are also excellent tools to help you have a fun and safe time in the outdoors. Practice these knots, and you will soon find many more uses for them!

source: http://www.wildernesscollege.com/camping-knots.html

Pill Bottle Survival Kit


DSC09378.JPG

Pill Bottle Survival Kit

This is a very simple and mini survival kit that covers the essentials of survival Enjoy!!!

DSC09386.JPG


DSC09387.JPG


Step 1


Contents

-Empty pill bottle
- 3 mini straw fire starters ( have an instructable on that)
-3 matches
-1 bandage
-1 striker
-1 hook
-1 weight
- tinfoil
-some fishing line
- razor blade
-2 safety pins
- 3 feet of duct tape
- 2 advils
- 1 birthday candle
- whistle made from straw
-Neosporin in a straw
-salt in a straw

source: http://www.instructables.com/id/Pill-Bottle-Survival-Kit/